Showing posts with label easy kitchen. Show all posts

Freezer-Friendly Pizza Penne

Admittedly, it has been awhile! And for that I am SO sorry. But, look to the blog next week for a little 'life lately" and you will see why I have had to take a small break from blogging! I am bringing back my Pizza Penne, because it is crazy simple for those Back to School nights. The best part is that this recipe is written for TWO dinners, enjoy one the night of and freeze one for those hectic Fall nights! 

This recipe makes 2 full dinners, so make one for tonight and save one to freeze. I did not add in any veggies into this recipe, but feel free to add away. We served ours with a nice summer salad, so our veggies were taken care of for the day!


Pizza Penne Cassserole

Ingredients:
1 package of Whole Wheat Penne pasta (about 15 oz)
3 cups of my homemade spaghetti sauce (or one can of sauce)
3 cups of mozzarella cheese
1 package of pepperoni, sliced into small pieces
1 cup of Parmesan cheese
1 cup of panko bread crumbs 

Directions:
Preheat oven to 350°
Cook pasta to al dente, about 8-9 minutes. When cooked drain water and rinse with cool water to cool down the noodles. 
Mix in all the sauce, 2 cups of the mozzarella, pepperoni, and ½ of the Parmesan cheese. 
Dump pasta into two well greased 8x8 pans. Top with the remaining cheeses and panko bread crumbs. Making sure to divide the contents evenly between the two dishes. 
Set one aside to cool down so you can freeze.
The other casserole will cook for 20-25 minutes or until bubbly.
 The last minute turn on broiler to low and place directly under heat, this will brown the bread crumbs. 


Reheating Directions:
If completely frozen, keep covered and cook for 1 hour - 1 hour 15 minutes. Remove the foil and cook for an additional 10 minutes, using the last minute to brown the bread crumbs under your broiler. 


This will keep in your freezer for 3-4 months. 

Happy freezing, 


Vote For Me @ The Top Mommy Blogs Directory

The Very Berry Greek Popsicle!

Why is it the day after you throw out all ice cream in your fridge, you desperately want ice cream? I am not an ice cream person, my husband is, so we typically have some in our freezer. Occasionally, I go through sugar purging mode, and get rid of all the mostly eaten culprits. Ice cream is not my go to sweet, but when I CAN'T have it, I want it. I suppose that theory could be applied to many things in life, but a week ago it was applied to me needing ice cream and having none on hand. 

Insert our newest Popsicle creation, The Very Berry Greek Popsicle


Super simple ingredients and very easy to whip up! 


Ingredients:
1 cup greek yogurt (we use Greek God's Honey Greek Yogurt)
1 cup blueberries
BIG handful of spinach
1 tbsp of Agave in the Raw (if you don't use a flavored greek yogurt, I would go with 2-3 tbsp)

Directions:
Throw in the yogurt, blueberries and agave in the raw, blend!

Throw in your handful of spinach, blend until well incorporated.

Pour into your Popsicle forms and let freeze for at least 2 hours. 


As always, I made a little smoothie for an afternoon snack for Luke and poured the rest into the forms. We enjoyed these out on the patio for dessert and Luke was a BIG fan. 

This is his, "mom, I just want to eat my popsicle" face! 

I think that I have successfully made this into the summer of the Popsicle. We are having so much fun coming up with these variations. What else would you want to see put into Popsicle form?

Happy blending,


Vote For Me @ The Top Mommy Blogs Directory


It's a Popsicle Month!

Happy July! With July comes lots of cookouts, fireworks and backyard parties so I thought what better way to celebrate the month than with popsicles!! 

easy popsicle recipes

Our monthly #freezerlovefriday theme will be Popsicles and while I love the store bought version, I also love to create Popsicles with Luke. This one was actually created by him and uses his two favorite fruits, strawberries and blueberries! Throughout the month I will add in some ingredients you wouldn't think would translate into a Popsicle, but trust me, you will LOVE them! 


easy popsicle recipes

The Strawberry/Blueberry Popsicle Mashup!
Yields: About 6 Popsicles

Ingredients:

1 cup coconut water
1 cup strawberries
1 cup blueberries
2-3 mint leaves
Popsicle Molds 

Directions:

In your blender, combine the strawberries, half of your coconut water and your mint leaves. Blend until well mixed. Set aside

Next, blend your blueberries with the rest of the coconut water. If your ingredients are frozen you may need some more water, that's OK you just want a smooth texture. Set aside. 

 Pour in your blueberry mixture and place in freezer for 10 minutes. This helps form the Popsicle so the ingredients won't mix. 

Pour your strawberry mixture in the Popsicle molds and place in freezer for 10 minutes.

Lastly top with remaining blueberry mixture and let freeze overnight. Any extra you have, make into a smoothie.

Enjoy!


easy popsicle recipes


Happy freezing, 


Vote For Me @ The Top Mommy Blogs Directory Vote For Me @ The Top Mommy Blogs Directory

Mini Shepard's Pie - The Perfect Addition to your Freezer!

Shepard’s Pie is a staple in our house. The idea of a good Shepard’s Pie is to throw whatever you have in the fridge and top with mashed potatoes. This dish reminds me of home, and I love it! I thought a fun spin on the common Shepard’s Pie would be to make them into smaller portions and be able to freeze them. While this may seem time consuming and a bit of a space waster, I assure you that it is in fact genius. Think about it…. Want a good lunch but you don’t want to heat up a huge portion of something? Grab a personal Shepard’s Pie! Family is out of town and you don’t feel like take-out? Grab a personal Shepard’s Pie!


I used small foil containers that I found at the dollar store, but I am sure you could use pretty much anything that is about that size and could be stacked in the freezer to save space. With this recipe I was able to make 7 mini casseroles.

Shepard's Pie

Ingredients:
5 medium potatoes cooked and mashed
¼ cup sour cream
¼ cup milk
2 TB butter 
2 cans of mixed vegetables
1 pound of ground turkey or ground beef
½ t paprika 
½ garlic salt 
Cheddar Cheese

Directions:
Preheat oven to 350°
Spray the foil mini pans well, and set aside.
Cook the meat until browned, adding in the paprika and the garlic powder for flavor.
Cook your potatoes. Using a handheld mixer, mash the potatoes with the milk, butter and sour cream.
Assemble the bowls one by one.
Meat, Vegetables and topped with potatoes and cheese.


Cook in oven for 20-25 minutes or until the cheese is bubbly. Broiling the casseroles for the last minute, to get the browned topping. 


Enjoy! 


Freezing Directions:
Let the bowls cool completely.
Cover with foil and place in small Ziploc bag.
Freeze for up to 3 months
Reheating:
Place in convection oven at 400° for 45-50 minutes and cook until completely cooked through. If you have let them thaw, they will not need quite as long!


Mini casseroles are going to become a favorite of mine, I just know it! Now that I am eating roughly 15 times daily, I need small snacks I can eat up and enjoy. I hope you love them as much as we do!

Happy freezing,


Stuffed Hashbrown Casserole

Welcome to #freezerlovefriday casserole month!! This month I will feature all types of casseroles that you can make and freeze for later. Whether it is your staple breakfast casserole or the perfect mashed potato casserole, this month will have something for everyone. 


Regardless if I am hosting my family for the holidays or just enjoying the weekend at home, I love to serve an easy egg casserole. Nothing is simpler than reaching into your freezer and pulling out a prepared casserole, popping it into the oven and sitting down and enjoying your coffee while breakfast cooks. 


freezer friendly breakfast ideas

Stuffed Hashbrown Casserole 
Yields 1 8x8 casserole
Double if wanting to freeze or make a larger casserole!

Ingredients:

2 tb EVOO
2 cups cut vegetables - I used mushrooms, squash and zucchini
½ pd of turkey (about 2 cups)
¼ t mustard powder
½ t paprika 
8 eggs
6 hash browns 
salt and pepper to taste
½ cup cheddar cheese

Directions:

Preheat oven to 425° and grease 8x8 well. 
Line up your hash browns along the bottom. I cut some of mine to fit into the square shape. 
Cook hash browns for 12-14 minutes. 

While the hash browns are cooking, in a large sauce pan brown your turkey. Add in the vegetables and cook 5-7 minutes or until cooked through. Add in the mustard powder and the paprika. 

In a large bowl, whisk your eggs until they are well scrambled. Add in the cooked meat and vegetables. 

Once the hash browns have cooked, lower the oven to 375° and pour the eggs, meat and vegetables on top of the hash browns. Sprinkle salt and pepper to taste. 

Cook 35 minutes or until the eggs have completely set. 

Sprinkle cheddar cheese on top and serve hot. 

Enjoy!


Freezing Directions:

Everything is essentially the same if you are freezing the casserole. You will want to cook the hash browns in the oven for 12-14 minutes and let cool completely. Once those have cooled, pour your egg. meat and vegetable mixture on top. Cover with foil and wrap in saran wrap. You will freeze the eggs uncooked! When reheating, if completely frozen this recipe will cook for about 1 hour to 1 hour 15 minutes. 

We ate this dish for dinner and Ryan was super impressed. I served mine up with ketchup (thank you, Baby Nye for making that a HUGE craving of mine), and it was spectacular! I hope your family enjoys this just as much as we did. 

Happy freezing, 


Vote For Me @ The Top Mommy Blogs Directory Vote For Me @ The Top Mommy Blogs Directory


The Perfect, Freezable Lasagna!

This month of #freezerlovefriday has been fun! I love a good pasta dish, and I love having my freezer stocked full of them. Being military, we are often surrounded by friends who don't have family near by. So, when they have a baby or are going through a sickness, meal trains are a necessity. I love being able to grab something from the freeze and sign up for a few days of the meal train service. Which recipes have you made to help stock your freezer?

Also, are grilling this weekend? Need some amazing grilling marinades? Make sure to check out my pineapple BBQ and chili lime marinades, your family will love them! 

I am bringing back one of my original recipes, with a few changes. This lasagna is so easy and so good. Of course, I am using my homemade sauce, but feel free to buy marinara sauce if you have not had the chance to make my sauce. 


Easy Lasagna


The Perfect, Freezable Lasagna!
Yield 4 8x8 pans

Ingredients:

1 pound beef
1 pound turkey 
1 cup cut squash 
¼ cup onion
4-5 cups of sauce (recipe HERE)
2 8oz can of tomato sauce
1 t salt
¼ t onion powder
½ t garlic powder
½ tbsp Italian seasoning 
2 boxes of no cook lasagna noodles 
15 oz ricotta cheese
1 cup shredded Parmesan cheese
1 tbsp parsley flakes 
32 oz bag of mozzarella cheese
EVOO

Directions:

Brown meat in skillet

Cook vegetables in EVOO along with salt, onion/ garlic powder and Italian seasoning. 

Combine all together including marinara sauce and tomato sauce. Simmer for 10 minutes and let cool.

Combine ricotta cheese, Parmesan cheese and parsley flakes. 

 My noodles were not the right size do the 8in foil pan, so I ended up having to break some off. Make sure to measure and try yours before you start loading them up! 

Spray bottom of pan lightly with Pam. 


Order:
Light layer of sauce
Noddles
Sauce 
Ricotta mixture
Cover with mozzarella cheese
Noodles
Sauce 
Mozzarella cheese 


Spray a piece of foil with Pam (so cheese does not stick to foil) and cover dish.

Bake covered with foil for 45 minutes.

Uncover and cook for 15 minutes more.

Enjoy! 

Freezing directions:

Spray foil with Pam spray
Cover dish 
Cover with Saran Wrap completely
Place directions on top and place in large ziplock bag. 
Cool completely and freeze for up to 2 months. 

If cooking when lasagna is frozen, it will require up to 2 hours at 350 degrees. I typically will take mine out of the freezer 48 hours in advance and place in  refrigerator. It is not necessary to unfreeze, just easier on your oven! 

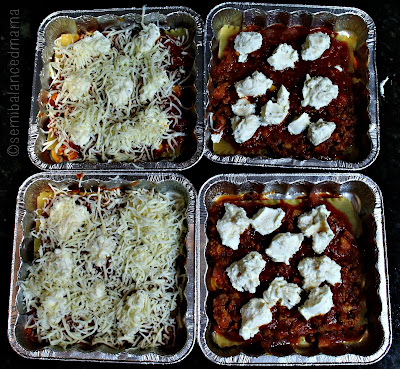
The bottom left was the freezer version and I was giving the other three away, so placed foil (ready to bake) with the plastic lid that pan comes with!


I hope you enjoy these as much as we did! 

Happy freezing,


Vote For Me @ The Top Mommy Blogs Directory Vote For Me @ The Top Mommy Blogs Directory


The Perfect, Freezable, Baked Spaghetti Recipe!

When we got married, I made 5 different recipes on rotation. Remember, I was the ripe old age of 23 and coming off of the Ramen noodle college diet. God love my husband for being patient and knowing that one day my kitchen skills would expand. Baked spaghetti was one of these recipes and occasionally my husband will amaze me and ask for this for dinner. It really is the simplest and most delicious baked spaghetti recipe, ever! 

You won't see any vegetables in this recipe, because the my homemade spaghetti sauce is loaded with them. If you have not made my freezable spaghetti sauce, hurry and make a big batch. If you have not made the sauce, use plain old store bought sauce but make sure to add in some veggies! 


Freezer Friendly Baked Spaghetti

Yields 2 8x8 Pans! 

Ingredients:
4 cups cooked spaghetti
4 cups of homemade spaghetti sauce (recipe here)
1 cup of mozzarella 
½ cup of fresh Parmesan
½ cup of panko break crumbs

Directions: 

Grease a 8x8 baking pan. Cook your noodles to al dente, and mix with the sauce after completely cooked. 

Dump mixture into the greased pan. Top with mozzarella, than the Parmesan cheese and than finally the bread crumbs. 

Cook at 350° for 25-30 minutes, until bubbly and hot. Lastly, place under broil for 1-2 minutes to brown the bread crumbs before serving. 


Enjoy!


Freezing Directions:

This makes two 8x8 pans, so serve one hot and freeze the second one for the future. You can freeze with cheese and bread crumb mixture on top, but wait to put the topping on until the spaghetti has completely cooled. If frozen cook for 55-65 minutes at 350°. 


Happy freezing, 


Vote For Me @ The Top Mommy Blogs Directory Vote For Me @ The Top Mommy Blogs Directory


Happy National Chocolate Chip Cookie Day!

Ya'll, we love a good chocolate chip cookie. We make a batch at least 2-3 times a month and we LOVE to share the goodies. Luke and I love making them together, and while his favorite part is taste testing the batter before we put the egg in, my favorite part is when they come out of the oven. 

the best chocolate chip cookies

To celebrate this epic holiday, I wanted to share with you my chocolate chip cookie recipe. The recipe is adapted from the original Nestle Toll House recipe, but I add in a few ingredients to make the cookies even better! 
Hope you get to celebrate today, with your little ones in the kitchen.  

The BEST Chocolate Chip Cookies!

Ingredients:

2 ¼ cups whole wheat flour
1 teaspoon baking soda
1 teaspoon salt
½ teaspoon cinnamon
1 ¼ cup butter
¾ cup granulated sugar
¾ cup packed brown sugar
1 teaspoon vanilla extract
2 large eggs
2 ½ cups chocolate chips

Directions:

Preheat Oven to 350°

Combine flour, baking soda and salt in small bowl. 

Beat butter, granulated sugar, brown sugar and vanilla extract in large mixer bowl until creamy. Add eggs, one at a time, beating well after each addition. 

Gradually beat in flour mixture. Add chocolate chips and hand stir until well mixed. Drop by rounded tablespoon onto baking sheets, lined with parchment paper. 

Bake for 8-9 minutes, let cool on cookie sheets for 2 minutes and remove to wire rack to continue cooling! 


semibalancedmama cookies


Happy baking, 


Freezable Homemade Spaghetti Sauce

I have missed you all this week! I have been battling a horrible cold/allergies/I want to cut off my nose sickness, so I took a week away from blogging and social media to focus on getting better. The good news is that due to my #freezerlovefriday stash, I didn't have to cook one time this week. I was able to still provide dinner for the family, which was so helpful and such a relief. 


May is still pasta month and to go along with pasta month, I want to share with you my favorite homemade spaghetti sauce!


A few years back I decided to start making my spaghetti sauce. Not only for the cost effectiveness, but also because sauce can be a hit or miss. I am definitely a sale shopper and I often found the sauce that was on sale at the time was not my favorite. By making my own, I know what it will taste like and I can buy in bulk. It just makes sense. I make this sauce about once a month and it lasts me a few different dishes. It is made in the crockpot, which is super simple and effective. As with most of my recipes, this sauce is loaded with veggies. If you don't want to add veggies or you want to try other ones, go for it! Just stay true to the seasoning and you should be good to go! 


Crockpot Spaghetti Sauce!
Yields 6-8 cups 

Ingredients:

2 cans of Italian crushed tomatoes 
1 can tomato paste
1 t garlic
½ t onion powder
½ tbsp. Italian seasoning 
½ t salt
1 tbsp. sugar
1 tbsp. pure maple syrup
½ cup diced onions 
¾ cups diced squash and zucchini
2 large handfuls of spinach or kale 
2 pds cooked ground beef, sausage or ground turkey


Directions: 

In a large crockpot add in the tomatoes, paste and all spices. 

Chop vegetables into small pieces. Cook in large saucepan until completely cooked through. As you can see, I don't usually puree my spinach after cooking, we don't mind seeing the bits of green. But if you want to "hide" it or do not want to see it, puree it before adding. Brown whatever meat you like, I usually opt for Italian sausage or hamburger meat and combine in the crockpot with the cooked vegetables. 

Cook on low for 3-4 hours. 

Freezing:

My favorite ways to store the sauce is in a large Ziploc or a few mason jars. That way if just Luke and I are eating, I whip out a mason jar size or if I am making a large batch of freezer meals I use the larger portions in the Ziploc bag. 

The next two weeks of #freezerlovefriday will be used with this sauce, so I thought it was a good time to go over making it! I love making large batches of this sauce and having it on hand. 


Happy freezing, 


Vote For Me @ The Top Mommy Blogs Directory Vote For Me @ The Top Mommy Blogs Directory