Showing posts with label easy dinner. Show all posts

a beertastic pumpkin dinner!


The month of pumpkin has been so much fun to host throughout October! My love for pumpkin is severe, but it is well deserved. Pumpkin adds flavor, nutrients and should be used as often as possible, in my opinion! 

My last recipe for the month of October  (I am in no way saying this is my last pumpkin recipe for Fall) is Pumpkin Ale Chicken Chili. It is spicy and earthy, and the perfect addition to a cold Fall night! I know I am bias, but this dinner was pretty darn good. Make sure to read all the way to the bottom for my beer bread recipe!


Pumpkin Ale Chicken Chili 

Ingredients:

2 large chicken breasts cut up into bite size pieces (or hamburger meat)
2 T of coconut oil  
4-5 cloves of garlic, minced
1 medium onion, chopped
2 large carrots, diced
1 red bell pepper, diced
1 teaspoon cumin
1 tablespoon dried oregano
1/2 teaspoon cinnamon
Dash of chili powder (or ¼ teaspoon, if you want spicy)
1 tablespoon tomato paste
1 cup pumpkin ale (I used Shipyard Pumpkin Ale)
1 15 oz can of pure pumpkin puree
1 15 oz can of diced tomatoes
1 15 oz can of black beans, drained 
1 15 oz can of cannellini beans, drained
½ cup chicken broth 
Salt and freshly ground black pepper

Directions:

Combine beans, diced tomatoes, chicken broth, tomato paste, and spices into a crockpot. 

In a medium saucepan, melt the coconut oil and brown and cook the chicken. Deglaze the pan with 1/2 cup of pumpkin ale, let simmer for 5 minutes. Dump into the slow cooker. 

In the same saucepan, cook the chopped vegetables (onion, carrots, and bell pepper). Once they are cooked through, add in the chopped garlic, cook until you smell the fragrance. Deglaze pan with remaining beer, let simmer for 5 minutes. Dump into slow cooker.

Mix everything in the crockpot and let cook on low for 2 hours. 

Served warm, topped with cheese and add pepper and salt to taste!

Enjoy!  


I served this chili with Beer Bread, as I am sure you have noticed in the pictures! I had made some in the past, but had neglected to sift the flour. Let me tell you, IT MATTERS! This bread is moist and SO easy to make. I used the same beer as the chili, Shipyard Pumpkin Ale, and thought it turned out perfectly. It was not pumpkiny, at all.


Beer Bread

Ingredients:
3 cups of whole wheat flour, sifted (trust me, do this step!)
½ cup of sugar
3 t baking powder (do not use if using self rising flour)  
1 t salt (do not use if using self rising flour)  
1 12 oz bottle of beer (I used Shipyard Pumpkin Ale)
½ cup melted butter
¼ t of cinnamon 

Directions:

Preheat oven to 375°

Grease a bread pan, I use coconut oil, making sure to completely cover. 

Combine all ingredients in a mixing bowl, mix well. Pour into well greased pan and sprinkle with the cinnamon. 

Cook for 45 min, and let sit for 15 min, before removing from pan.

Enjoy!


Happy cooking,


Mini Shepard's Pie - The Perfect Addition to your Freezer!

Shepard’s Pie is a staple in our house. The idea of a good Shepard’s Pie is to throw whatever you have in the fridge and top with mashed potatoes. This dish reminds me of home, and I love it! I thought a fun spin on the common Shepard’s Pie would be to make them into smaller portions and be able to freeze them. While this may seem time consuming and a bit of a space waster, I assure you that it is in fact genius. Think about it…. Want a good lunch but you don’t want to heat up a huge portion of something? Grab a personal Shepard’s Pie! Family is out of town and you don’t feel like take-out? Grab a personal Shepard’s Pie!


I used small foil containers that I found at the dollar store, but I am sure you could use pretty much anything that is about that size and could be stacked in the freezer to save space. With this recipe I was able to make 7 mini casseroles.

Shepard's Pie

Ingredients:
5 medium potatoes cooked and mashed
¼ cup sour cream
¼ cup milk
2 TB butter 
2 cans of mixed vegetables
1 pound of ground turkey or ground beef
½ t paprika 
½ garlic salt 
Cheddar Cheese

Directions:
Preheat oven to 350°
Spray the foil mini pans well, and set aside.
Cook the meat until browned, adding in the paprika and the garlic powder for flavor.
Cook your potatoes. Using a handheld mixer, mash the potatoes with the milk, butter and sour cream.
Assemble the bowls one by one.
Meat, Vegetables and topped with potatoes and cheese.


Cook in oven for 20-25 minutes or until the cheese is bubbly. Broiling the casseroles for the last minute, to get the browned topping. 


Enjoy! 


Freezing Directions:
Let the bowls cool completely.
Cover with foil and place in small Ziploc bag.
Freeze for up to 3 months
Reheating:
Place in convection oven at 400° for 45-50 minutes and cook until completely cooked through. If you have let them thaw, they will not need quite as long!


Mini casseroles are going to become a favorite of mine, I just know it! Now that I am eating roughly 15 times daily, I need small snacks I can eat up and enjoy. I hope you love them as much as we do!

Happy freezing,


The Perfect, Freezable Lasagna!

This month of #freezerlovefriday has been fun! I love a good pasta dish, and I love having my freezer stocked full of them. Being military, we are often surrounded by friends who don't have family near by. So, when they have a baby or are going through a sickness, meal trains are a necessity. I love being able to grab something from the freeze and sign up for a few days of the meal train service. Which recipes have you made to help stock your freezer?

Also, are grilling this weekend? Need some amazing grilling marinades? Make sure to check out my pineapple BBQ and chili lime marinades, your family will love them! 

I am bringing back one of my original recipes, with a few changes. This lasagna is so easy and so good. Of course, I am using my homemade sauce, but feel free to buy marinara sauce if you have not had the chance to make my sauce. 


Easy Lasagna


The Perfect, Freezable Lasagna!
Yield 4 8x8 pans

Ingredients:

1 pound beef
1 pound turkey 
1 cup cut squash 
¼ cup onion
4-5 cups of sauce (recipe HERE)
2 8oz can of tomato sauce
1 t salt
¼ t onion powder
½ t garlic powder
½ tbsp Italian seasoning 
2 boxes of no cook lasagna noodles 
15 oz ricotta cheese
1 cup shredded Parmesan cheese
1 tbsp parsley flakes 
32 oz bag of mozzarella cheese
EVOO

Directions:

Brown meat in skillet

Cook vegetables in EVOO along with salt, onion/ garlic powder and Italian seasoning. 

Combine all together including marinara sauce and tomato sauce. Simmer for 10 minutes and let cool.

Combine ricotta cheese, Parmesan cheese and parsley flakes. 

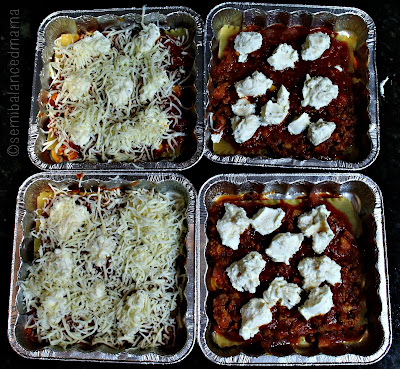
 My noodles were not the right size do the 8in foil pan, so I ended up having to break some off. Make sure to measure and try yours before you start loading them up! 

Spray bottom of pan lightly with Pam. 


Order:
Light layer of sauce
Noddles
Sauce 
Ricotta mixture
Cover with mozzarella cheese
Noodles
Sauce 
Mozzarella cheese 


Spray a piece of foil with Pam (so cheese does not stick to foil) and cover dish.

Bake covered with foil for 45 minutes.

Uncover and cook for 15 minutes more.

Enjoy! 

Freezing directions:

Spray foil with Pam spray
Cover dish 
Cover with Saran Wrap completely
Place directions on top and place in large ziplock bag. 
Cool completely and freeze for up to 2 months. 

If cooking when lasagna is frozen, it will require up to 2 hours at 350 degrees. I typically will take mine out of the freezer 48 hours in advance and place in  refrigerator. It is not necessary to unfreeze, just easier on your oven! 

The bottom left was the freezer version and I was giving the other three away, so placed foil (ready to bake) with the plastic lid that pan comes with!


I hope you enjoy these as much as we did! 

Happy freezing,


Vote For Me @ The Top Mommy Blogs Directory Vote For Me @ The Top Mommy Blogs Directory


The Perfect, Freezable, Baked Spaghetti Recipe!

When we got married, I made 5 different recipes on rotation. Remember, I was the ripe old age of 23 and coming off of the Ramen noodle college diet. God love my husband for being patient and knowing that one day my kitchen skills would expand. Baked spaghetti was one of these recipes and occasionally my husband will amaze me and ask for this for dinner. It really is the simplest and most delicious baked spaghetti recipe, ever! 

You won't see any vegetables in this recipe, because the my homemade spaghetti sauce is loaded with them. If you have not made my freezable spaghetti sauce, hurry and make a big batch. If you have not made the sauce, use plain old store bought sauce but make sure to add in some veggies! 


Freezer Friendly Baked Spaghetti

Yields 2 8x8 Pans! 

Ingredients:
4 cups cooked spaghetti
4 cups of homemade spaghetti sauce (recipe here)
1 cup of mozzarella 
½ cup of fresh Parmesan
½ cup of panko break crumbs

Directions: 

Grease a 8x8 baking pan. Cook your noodles to al dente, and mix with the sauce after completely cooked. 

Dump mixture into the greased pan. Top with mozzarella, than the Parmesan cheese and than finally the bread crumbs. 

Cook at 350° for 25-30 minutes, until bubbly and hot. Lastly, place under broil for 1-2 minutes to brown the bread crumbs before serving. 


Enjoy!


Freezing Directions:

This makes two 8x8 pans, so serve one hot and freeze the second one for the future. You can freeze with cheese and bread crumb mixture on top, but wait to put the topping on until the spaghetti has completely cooled. If frozen cook for 55-65 minutes at 350°. 


Happy freezing, 


Vote For Me @ The Top Mommy Blogs Directory Vote For Me @ The Top Mommy Blogs Directory


#freezerlovefriday does grilling season - Chili Lime Chicken

I have come to love limes! I like them in my water, I sometimes like them in my margarita and I really like them in a chicken marinade. They add a zest and sweetness that is so distinct. 

I like to serve this chicken with a Spanish style dirty rice and steamed radishes and broccoli. Of course, this dinner would also be wonderful paired with a Corona or a DOS Equis, but hey that is just me!!


Chili Lime Chicken 
Yields 4-6 Chicken Breasts/Thighs

Ingredients:

Juice of 5 limes
2 tbsp coconut oil
1 tbsp chili powder
¼ t onion powder
¼ t garlic powder
¼ t salt 
4 chicken breasts

Directions:

Mix all of the ingredients together. 
Trim excess fat off of the chicken breasts and place in a large baggie. 
Let sit in refrigerator for one day and freeze laying flat for up to 3 months!


Happy grilling, 


Love this recipe? Make sure to click below ↓ to vote for me once a day!


Vote For Me @ The Top Mommy Blogs Directory Vote For Me @ The Top Mommy Blogs Directory

#freezerlovefriday does grilling season - lemon rosemary chicken

While I love BBQ sauce, I also like earthy tasting chicken. 
My Lemon Rosemary Chicken is one of my favorite marinades!  I will typically make this will a Long Grain and Wild Rice mix and serve it up with Asparagus or another root vegetable. I also like to save the leftovers to top my salads with for the week, it adds so much flavor you really don't need any salad dressing other than olive oil and maybe a little balsamic! 


Lemon Rosemary Chicken 
Yields 4-6 Chicken Breasts/Thighs
Ingredients:
Juice of 3 lemons
2 tbsp coconut oil
1 sprig of rosemary
1 tbsp Italian seasoning
¼ garlic powder
½ tbsp sugar
4 chicken breasts or thighs

Directions:

Mix all of the ingredients together.
Trim excess fat off of the chicken breasts and place in a large baggie.
Let sit in refrigerator for one day and freeze laying flat for up to 3 months!


Happy grilling, 


Love this recipe? Make sure to click below ↓ to vote for me once a day!


Vote For Me @ The Top Mommy Blogs Directory Vote For Me @ The Top Mommy Blogs Directory


#freezerlovefriday does grilling season - pineapple bbq chicken

Can you believe it is MARCH? This year has flown by. With warmer temperature comes my favorite time of the year, grilling season! We use a charcoal grill, mainly because we prefer the earthy taste it delivers. In Arizona you can pretty much grill any time of year, but there is something about the evening hours in the spring time. It makes you want to sit outside, watch your husband grill, your kid play and sip on a nice glass of Chardonnay! 


I am here to tell you that you can freeze marinated chicken. Now you may be wondering what the benefit of freezing the marinated chicken is, since it doesn't take too long to throw together a few ingredients. The longer the chicken has to marinate, the more the flavor will soak in. Also, it is super easy to know that you have 3-4 bags of marinated chicken in your freezer, ready to go for the next time you feel like grilling! I will typically buy two large chicken breast packets at Costco and make 2 of each of my favorite marinades. This month I will give you 4 marinades, which means you could potentially have 8 meals in your freezer!! 


Pineapple BBQ Marinade
Yields 4-6 Chicken Breasts/Thighs

Ingredients:

½ cup pineapple juice
1 cup sweet Baby Rays BBQ sauce
¼cup brown sugar
3 slices of pineapple cut up
½ tsp of garlic powder
½ tap of onion powder
4 chicken breast or 4 chicken thighs

Directions:

Mix all of the ingredients together. 
Trim excess fat off of the chicken breasts and place in a large baggie. 
Let sit in refrigerator for one day and freeze laying flat for up to 3 months!


Laying it flat to freeze will save on room
and ensure the marinade fully covers the chicken! 


Happy grilling, 


Love this recipe? Make sure to click below ↓ to vote for me once a day!

Vote For Me @ The Top Mommy Blogs Directory Vote For Me @ The Top Mommy Blogs Directory

loaded quinoa chili

Living in southern AZ, we don't get many chances to eat chili, soup or anything else hot for that matter. We have about 2 months where we will have sporadic days of cold and you have to capitalize on those. Let me be the first to say that I do not miss winter, honestly. I like snow, but if I drive 1 hour I can play in snow for a bit and then head back home to 75 weather. 

So having today's #freezerlovefriday in the freezer, ready to go for the cold weather, is a must! If you are like the other 85% of the population who gets snowed in a few days a year, you will love this chili!


Loaded Quinoa Chili 

Ingredients:
1 cup of shredded chicken (we love using a rotisserie chicken)
1 chopped sweet potato 
1 ½ cups of cooked quinoa
1 can of black beans, drained
1 can of kidney beans
2 cans of chili chopped tomatoes 
Packet of McCormick's Chili Spices 

Directions:
Cook quinoa per package directions.
In a dutch oven combine all ingredients.


Cook for at least 1 hour. 
Serve topped with cheese, avocados or anything else you can think of!


Super easy and super good!! 

Freezing Directions:
Wait for the chili to completely cool. Add all of the chili into a large Ziploc bag, label and freeze laying flat in the freezer.

Reheating:
No need to let this one thaw before reheating it. Just add all of the contents into the dutch oven, and cook until heated through. Or add to a microwave safe bowl and microwave until heated through. 

Quinoa month has been so much fun! I hope I have spotlighted how truly versatile this little super food can be!! We love it at our house, and hope you have enjoyed some this past month. 
Join me next week as I reveal February Ingredient of the Month!

Happy freezing, 


Don't forget to click below , and give semibalancedmama a vote!! Thank you! 

Vote for me @ Top Mommy Blogs - Mom Blog Directory


quinoa fried rice

#freezerlovefriday is usually a breakfast or a dinner recipe, so today I thought I would offer up a lunch idea. Luke and I are typically running around all morning, either at the gym or running errands so when we come home for lunch we need something quick and easy! 


I came up with Quinoa Fried Rice one day when I had made WAY too much quinoa the night before. I love fried rice, but hate spending the extra $2 to add it to my meal and the extra calories are no bueno either. This comes out with a bit of crunchiness to it (thanks to the bread crumbs) and is loaded with veggies. We love ours topped with eggs, but the possibilities are limitless with what you could top with. This is a vegetarian recipe, but I think sausage or ground turkey would be great with this! 


Quinoa Fried Rice 

Ingredients:
2 cups quinoa 
1 ½ cup bread crumbs
½ cup mixture of thinly cut squash and zucchini
1 can of black beans (you can use ½ a can if you aren't big on beans)
2 cloves of garlic, minced
Half of an onion, chopped
**Everything from here up is what you can freeze in a large Ziploc bag! 
1 egg
3 tbsp EVOO or coconut oil 
Pinch of salt and pepper 

Optional Toppings:
Fried Egg
Scrambled Eggs
Avocado 

Directions:
Prepare your quinoa per package directions and let sit 10 minutes. 

In a large bowl mix together prepared quinoa, bread crumbs, veggies, black beans, garlic and salt/pepper. 

Scramble the one egg in a separate bowl. Once scrambled add to the quinoa and mix well. 

Heat the EVOO or coconut oil in your cast iron skillet at medium to high heat. 

Once oil is hot, add in your quinoa mix. Mix occasionally and wait for the quinoa to slightly brown. 

Serve under a fried egg or avocado and enjoy hot! 


Luke's lunch serving with scrambled eggs! 
Freezing Instructions:
Make sure it completely cools before adding to a large Ziploc bag. 
It freezes nicely laying flat in your freezer. You can also freeze a few lunch size portions in small Ziploc baggies and have them ready to go for any day. 


Reheating:
You don't necessarily have to let the quinoa mix thaw before adding to the cast iron skillet. If you are cooking it frozen, wait until it is thaw in the skillet to add the scrambled egg. It takes roughly 5-7 minutes to cook frozen! We will typically bring the quinoa mix out of the freezer the morning of and have it thaw while we are out running errands.

Happy freezing, 


If you like what you just read please click to send a quick vote for me on Top Mommy Blogs- The best mommy blog directory featuring top mom bloggers